After all my experiments, now I'm able to use
OpenHAB with familiarity; so now it's time to build my first sensors.
Let's start from the kitchen where I would like to monitor
gas,
temperature and
humidity.
The MCU will be a
ESP8266 NodeMcu board. I chose this board because it has wifi, several digital I/O and an analog one, you can write firmware in the same way you could with Arduino and above all...it's very cheap...On
Banggood I bought two at only
€ 2,76 each, not bad...
If you are interested in it, this is the product link:
Geekcreit-Doit-NodeMcu-Lua-ESP8266 on Banggood.com
I will use these sensors:
-
MQ-4 gas sensor: for detecting of
methane mainly, (I'm interested on it...),
propane and
butane gas. I already used it months ago. Here is it:
MQ-4 gas sensor on Banggood.com
-
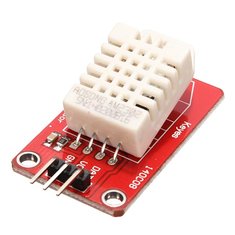
Humidity / Temperature sensor DHT11: it'a a very cheap sensor (with about €5 i bought 5); its error is +/- 2°C and it's able to get only positive temperature. Its precision is 1°C, so no decimal number...For these limitations I decided to buy other sensors, the
ds18b20 (for internal and external use)...I will use these
DHT11 just for humidity
5 pack on Banggood.com
3 Pack on Banggood.com
Single sensor on Banggood.com
-
Dallas ds18b20 temperature sensor: compared to the previous one it has a better precision (0,5°C) and it's able to get negative values, so it's ideal for external use
Single sensor on Banggood.com
5 Pack on Banggood.com
External probe on Banggood.com
I built some prototype using a breadboard...
...till I found the right configuration...and so I made a "
definitive" board...
I added a led used for the indication of network activity and a connector used for external power. The device will be powered through a little 5V 450mA power adapter, connected to the blue terminal blocks. In this way I could power up the device and also the sensors.
The
led,
ds18b20 and
DHT11 sensors are linked to digital I/O and the
MQ-4 gas sensor to the analog one.
Now it's time to write the firmware...I use
Visual Studio Code with
platformio extension; I think it's better than the
Arduino IDE (personal opinion). I chose this IDE because it also has an extension for
openHAB that let me edit configuration files in a better way (just like
Eclipse SmartHome Designer).
My device will connect to the
MQTT broker of
OpenHAB through wifi, fetch the data from the sensors and send them as
json formatted string with
nodemcu/mainfloor/esp8266mcu11/temphumiditygas/state topic.
The sample period is 5 seconds and each 60 seconds the average data will be sent to the
MQTT broker. When the data will be sent, the green led will blink twice.
Here is an example of a message sent to the
MQTT broker:
{"gas":{"error":"","sensorValue":46.33333,"ppm":0.431016,"percentage":0.000043,"realValue":829.0371},"tempHum":{"error":"","humidity":63.66667,"tempC":22,"tempF":71.59999,"heatIndexC":21.91774,"heatIndexF":71.45234},"temp":{"error":"","tempC":21.66667,"tempF":70.99999}}
The
gas object is related to the
MQ-4 sensor, the
tempHum object is related to the
DHT11 sensor and the
temp object is related to the
ds18b20 sensor.
For now I decided to use both sensors for temperature reading; so I can compare them.
Ok, it seems to work as expected...I put my device in the right place in the kitchen...
Now it's time to setup
OpenHAB...and build a new dashboard on
Grafana.
In
OpenHAB I created a new file called
esp8266mcu11.items (esp8266mcu11 is the unique id of the device) in the
/etc/openhab2/items folder; in this file I appended the following lines:
Number MainFloor_KitchenTemperature "Kitchen Temperature [%.1f °C]" <temperature>
(gPersistence)
{mqtt="<[openhabianpi-mqtt:nodemcu/mainfloor/esp8266mcu11/temphumiditygas/state:state:JSONPATH($.tempHum.tempC)]" }
Number MainFloor_KitchenTemperatureNew "Kitchen Temperature NEW [%.1f °C]" <temperature>
(gPersistence)
{mqtt="<[openhabianpi-mqtt:nodemcu/mainfloor/esp8266mcu11/temphumiditygas/state:state:JSONPATH($.temp.tempC)]" }
Number MainFloor_KitchenHumidity "Kitchen Humidity [%.1f %%]" <humidity>
(gPersistence)
{mqtt="<[openhabianpi-mqtt:nodemcu/mainfloor/esp8266mcu11/temphumiditygas/state:state:JSONPATH($.tempHum.humidity)]" }
Number MainFloor_KitchenGasPpm "Kitchen Gas [%.2f ppm]" <carbondioxide>
(gPersistence)
{mqtt="<[openhabianpi-mqtt:nodemcu/mainfloor/esp8266mcu11/temphumiditygas/state:state:JSONPATH($.gas.ppm)]" }
Number MainFloor_KitchenGasValue "Kitchen Value [%.2f]" <carbondioxide>
(gPersistence)
{mqtt="<[openhabianpi-mqtt:nodemcu/mainfloor/esp8266mcu11/temphumiditygas/state:state:JSONPATH($.gas.realValue)]" }
Now the sitemap:
Frame label="
Gas Detection" {
Text item=MainFloor_KitchenGasPpm valuecolor=[>800="red",>600="orange",<=600="green"]
}
Frame label="Kitchen" {
Text item=MainFloor_KitchenTemperatureNew
Text item=MainFloor_KitchenHumidity
}
And this is the result:
Good, I added a new brick...now I can create the new
Grafana dashboard with the gas, humidity and temperature of the kitchen:
Last step: adding the device to the network monitoring...so
OpenHAB will notify me when the device will be offline.
So, using
PAPERUI I added the device using the
Network Binding and create the items. Then I added the gNetworkCheck group to the "status" item, so its network presence will be monitored by
OpenHAB.