Welcome everybody in this new adventure related to eletric / electronic and computer world...
Finally, after a lot of time spent on thoughts and searches over the internet, I decided to enter in the world of
Arduino boards...
Electronic and computer things always involved me a lot...and thanks to
Piero's suggestions, I filled my electronic gaps and so now I'm able to design and build something useful.
Who already follows me, knows that I'm involved, always with the help of
Piero, in another ambitious and exciting project: the building of a flight simulator cockpit (details on
www.mylearjet45.net)
Instead, in this blog, I would like to write about my attempts to design and build something related to
domotics (home automation)...mainly using
Arduino and
Raspberry PI boards, with related extensions...
What are Arduino and Raspberry PI?
Arduino
Arduino is an open-source electronics platform based on easy-to-use hardware and software. It's intended for anyone making interactive projects. There is a wide range of products, based on technical characteristics and dimensions...
The
Starter Kits (
Arduino board plus a good range of useful accessories) are very useful for the beginners.
Through input/output pins and software programming, you can interface sensors and actuators in the real world...
There are a lot of expansion cards (called
shield) as
Wifi/Ethernet connectivity,
Infrared/Bluetooth transceiver,
Sd Card Reader and so on...
The programming language is based on C language and you can find a lot of examples over the internet.
References and official website
www.arduino.cc
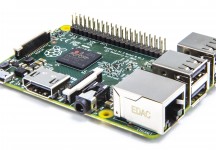
Raspberry PI
Unlike
Arduino,
Raspberry PI is a real, small (credit card size) and low power consumption PC, and is able to run many
Linux Distros. It has many
USB ports,
HDMI Output, 3.5mm
A/V Jack,
CPU and
Ram...
Link
Arduino it has many GPIO (
General
Purpouse
Input
Output) pins to interface real world sensors and actuators.
There is a wide range of models...the last one (February 2015) is
Raspberry Pi 2 Model B. These are its technical characteristics:
- A 900MHz quad-core ARM Cortex-A7 CPU
- 1GB RAM
- 4 USB ports
- 40 GPIO pins
- Full HDMI port
- Ethernet port
- Combined 3.5mm audio jack and composite video
- Camera interface (CSI)
- Display interface (DSI)
- Micro SD card slot
- VideoCore IV 3D graphics core
References and official website
www.raspberrypi.org
Both boards, used together, could be used to design infinite projects...fantasy is the only limit...
Now it's time to begin...with
Arduino...
...we are waiting for the
Starter Kit Arduno Uno Rev 3...
Stay tuned