Showing posts with label raspberry pi. Show all posts
Showing posts with label raspberry pi. Show all posts
Friday, 1 January 2021

Wednesday, 30 December 2020
Home Automation System - OpenHAB v. 3 - 08. OpenHAB Remote Binding: connected together
This blog is no longer updated.
To read this post please visit
Saturday, 26 December 2020
Home Automation System - OpenHAB v. 3 - 07. Migrating an InfluxDB database
This blog is no longer updated.
To read this post please visit
Wednesday, 23 December 2020
Home Automation System - OpenHAB v. 3 - 06. Dashboard with Grafana and InfluxDB
This blog is no longer updated.
To read this post please visit
Sunday, 20 December 2020
Home Automation System - OpenHAB v. 3 - 05. Persistence with InfluxDB
This blog is no longer updated.
To read this post please visit
Thursday, 17 December 2020
Home Automation System - OpenHAB v. 3 - 04. InfluxDB-Docker Get Started
This blog is no longer updated.
To read this post please visit
Friday, 11 December 2020
Home Automation System - OpenHAB v. 3 - 03. Sitemap
This blog is no longer updated.
To read this post please visit
Sunday, 6 December 2020
Home Automation System - OpenHAB v. 3 - 02. MQTT Test Part 2
This blog is no longer updated.
To read this post please visit
Wednesday, 2 December 2020
Home Automation System - OpenHAB v. 3 - 02. MQTT Test Part 1
This blog is no longer updated.
To read this post please visit
Sunday, 29 November 2020
Home Automation System - OpenHAB v. 3 - 01. Initial setup
This blog is no longer updated.
To read this post please visit
Friday, 19 January 2018
Home Automation System - Alarm and OpenHAB...my idea

I can't believe it!!! I reached a little goal...Home Alarm and OpenHAB together...
I know...It seems a simple thing...today home alarm systems can be remote controlled ... but the old ones (as mine is...) don't...
My target was to view the input status of all sensors / radars in my home alarm system...I don't like remote controller...just remote monitoring...
So, it's quite simple: I have to integrate all sensors / radars with a device, as Arduino or similar ones, and gets the input status (OPEN / CLOSE).
I have to know what kind of signal is transmitted by sensors / radars...I discovered the wires from the sensors / radar and with the tester I found the voltage is about 4.5v when the signal is HIGH and 0 when the signal is low.
I made some test with my main entrance door so I confirmed this behaviuor. Door OPEN, 4.5v on the terminal...DOOR closed, 0 voltage.
Now, I have to find a device with at least 11 GPIO 4.5v tolerant
I can choose between:
- a NodeMCU ESP8266 device, with integrated wifi; but it accepts only 4 volts

- an Arduino UNO with ethernet shield, with GPIO 5v tolerant;

The first choice would be the best, because we have integrated wifi and a very small layout...but I have to step down voltage from 4.5v to 3.3v (max)
Otherwise, using Arduino UNO, the voltage is already OK but I need a new shield (ethernet shield)
Idea!!!!!

Raspberry PI3 where OpenHAB and MQTT broker are running, has a lot of GPIO on its board. I could use them. But these GPIO works with 3.3v max. No problem...I will build an interface device with voltage divider...
Then I could use an OpenHAB bindings (see https://github.com/openhab/openhab1-addons/wiki/GPIO-Binding) to manage GPIO, so no needs for an external software...
Summarizing:
- take all alarm input wires to the Raspberry PI3
- build an interface to step down voltage from 4.5v to 3.3v
- download and setup of GPIO binding of OpenHAB (see https://github.com/openhab/openhab1-addons/wiki/GPIO-Binding)
- make a new sitemap to see the alarm device input
In the next post, I will descrive the operational phase of work
Saturday, 30 September 2017
Home Automation System - MQTT, SONOFF and OpenHAB v. 2
It's time to integrate MQTT and OpenHAB v.2.
As already said in a previous post (http://domoticsduino.blogspot.com/2017/08/home-automation-system-sonoff-and-mqtt_19.html), actually I have a SONOFF Basic already installed which drives a garden lamp. As we already know, it's already setup with MQTT and so let's start the OpenHAB integration.
I followed step by step the Tasmota wiki, in the integration section (https://github.com/arendst/Sonoff-Tasmota/wiki/openHAB) and so, as first step, I installed some ADDONS in OpenHAB:
- MQTT Binding: http://docs.openhab.org/addons/bindings/mqtt1/readme.html

- MQTT Action: http://docs.openhab.org/addons/actions/mqtt/readme.html

- JsonPath Transformation: http://docs.openhab.org/addons/transformations/jsonpath/readme.html

Now I have to setup the MQTT connection to the MQTT broker which runs on the same Raspberry PI 3 as OpenHAB 2; so I have to edit the configuration file /etc/openhab2/config/mqtt.cfg directly through the linux shell (nano or vi) or using Eclipse SmartHome Designer, an advanced text editor optimized for OpenHAB v.2 configuration files. I used it. Its setup is very simple and then it needs to know the OpenHAB configuration files path. In my case I setup a network drive (called Z) for a samba share automatically defined by the installation of openHABianPI.
In particular, the configuration parameters I edited are the following ones:
openhabianpi-mqtt.url=tcp://localhost:1883
serve and port of the MQTT broker
openhabianpi-mqtt.clientId=openhabianpi
openHAB client Id for the MQTT connection
openhabianpi-mqtt.user=openhabian
Username for the MQTT connection
openhabianpi-mqtt.pwd=XXXXXXX
Password for the MQTT connection
openhabianpi-mqtt.retain=true
Defines if the broker should retain the messages sent to it
openhabianpi-mqtt is the logical name of the MQTT connection; in OpenHAB we could have many MQTT connections and in the items configuration we use this name as reference.
If you don't make mistakes, during the OpenHAB boot you may find log messages as following:

Ok, now I will configure items and the sitemap .
So, I created a file called sonoffbasic01.items in the folder /etc/openhab2/items in which I setup my new items.
I defined a "Switch" object ("light" category) which was linked to the full topic mqtt of the SONOFF Basic 01 tasmota/garden/light/%topic%/%prefix%/. Here is the syntax:
Switch Garden_Light_1Lamp "Garden 1-Lamp" <light>
(gLightSwitchGarden)
{mqtt="
<[openhabianpi-mqtt:tasmota/garden/light/sonoffbasic01/stat/POWER:state:default],
(gLightSwitchGarden)
{mqtt="
<[openhabianpi-mqtt:tasmota/garden/light/sonoffbasic01/stat/POWER:state:default],
}
For info about syntax of .items files please see official documentation http://docs.openhab.org/configuration/items.html
In this way I created an item called Garden_Light_1Lamp linked to MQTT messages of topic defined in the {...} block
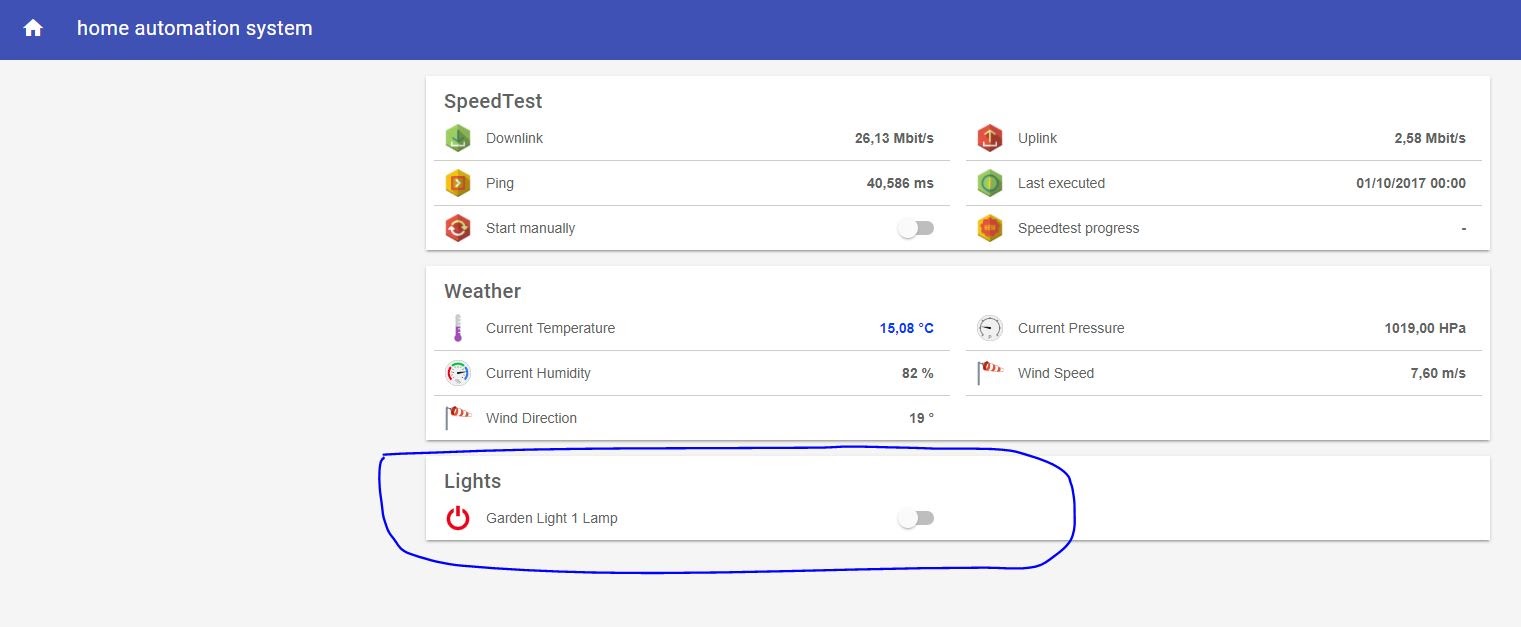
Then, I added this new item in my sitemap . So, I edited sitemap definition file, appending the following rows:
Switch item=Garden_Light_1Lamp label="Garden Light 1 Lamp" icon="switch"
}
After saved this file, OpenHAB updated the sitemap and the "lights" section appears
Here is a short video about my test:
Saturday, 5 August 2017
Home Automation System - OpenHAB 2 on Raspberry PI 3
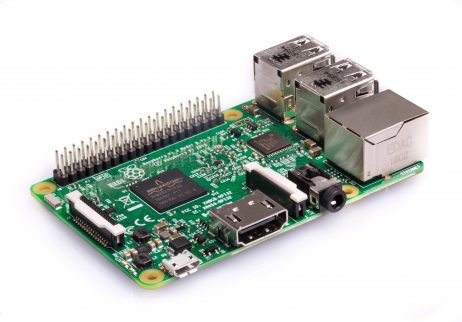

My target is to install OpenHAB v.2 and all related services on my brand new Raspberry PI 3; reading the official documentation (http://docs.openhab.org/installation/openhabian.html), I discovered OpenHABianPI, a custom operating system based on Raspian Lite, but optimized for OpenHAB. So I flashed on SD-CARD, with Etcher, a complete pre-configured image, downloaded from https://github.com/openhab/openhabian/releases. Then I plugged the SD-Card in the Raspberry slot and power it up, after connected a LAN cable (there is also a procedure to connect the raspberry direct to WiFi...http://docs.openhab.org/installation/openhabian.html#wifi-setup). The setup of OpenHABianPI automatically starts during boot and you can follow it through SSH. In about ten minutes the system will be ready.
The first thing to do is run the openhabian-config tool, which will let us to setup the complete system.
sudo openhabian-config

01 - Update and 02 - Upgrade System will keep the system updated and you will run them frequently.
Then...
- 10 - Apply Improvements ==> run all the submenù
- 20 - Optional Components ==> 21 - Log Viewer, 22 - Mosquitto (the MQTT broker) and 23 - Grafana (not mandatory but it's a very nice dashboard tool)
- 30 - System config ==> all optional except 34 - Change Passwords which will secure your system; 37 - Move root to USB; is a very useful choice...it lets you to use an external USB Hard disk, instead of SD Card. I configured both my raspberries in this way, but I followed a manual procedure (see https://www.raspberrypi.org/forums/viewtopic.php?f=29&t=44177&hilit=usb+stick+operating+system)
- 40 - openHAB related ==> 43 - Reverse Proxy very useful option to expose OpenHAB system on the internet and access it from everywhere; it will configure NGINX as SSL reverse proxy - pay attention that with this option your system will be exposed to internet and so if not well secured could permit to everyone to take control of your home devices.
Ok, OpenHAB is ready to use. I suggest you to take a look at the official documentation, tutorials and forum on the OpenHAB website http://docs.openhab.org/ https://community.openhab.org
The official youtube channel is https://www.youtube.com/channel/UC7OK88DW0La_BJlcXZg8ydQ/feed
Just another useful info: OpenHAB could use a lot of services to persist data; one of these services uses InfluxDB, a NOSQL database. It lets OpenHAB to store historical data series which could be displayed as charts or tables. Grafana, the open source dashboard tool, is perfectly integrated with InfluxDB. You could also use the standard MYSQL RDBMS as a persistence service. I will use InfluxDB, and so I will install it on the same raspberry as openHAB (see https://docs.influxdata.com/influxdb/v1.3/introduction/installation/)
Let's summarize my system:
- OpenHAB v 2.1
- Mosquitto MQTT Broker, with authentication
- Grafana
- InfluxDB, as OpenHAB persistence service
- Reverse proxy SSL with authentication, through NGINX , to expose OpenHAB and Grafana on the internet, in a secure way
If you are not able to setup and mantain reverse proxy, NAT and port forwarding, you could use My OpenHAB service, which lets you to exposed on the internet a local OpenHAB installation; registration is required.
Ok, we are ready to use our Home Automation System

Tuesday, 1 August 2017
Home Automation System - New mailbag...
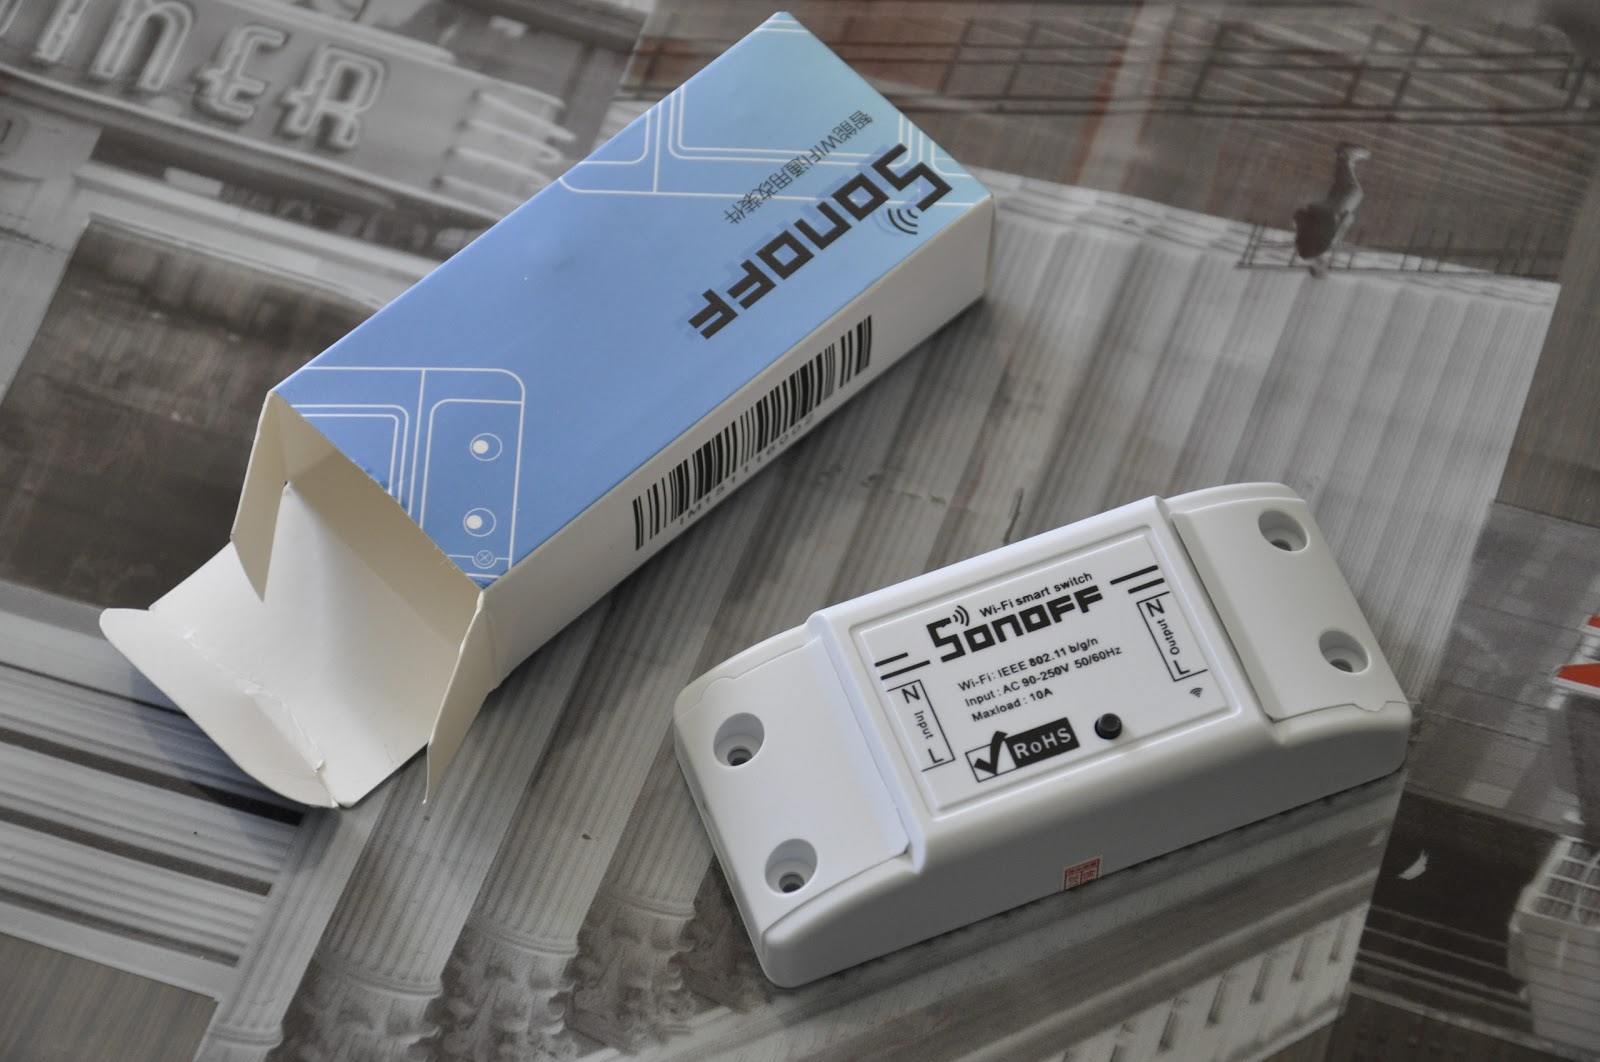
In the meantime, time passes by and a new mailbag is arrived; it contains new toys for my Home Automation System: a Basic SONOFF and a Raspberry PI 3.
The Basic SONOFF is a simple WiFi switch, as the SONOFF Pow, which we already know, but without the power measurement chip. In simple words, it's a WiFi controlled relay.
The Raspberry PI 3 is the world famous mini PC (see https://www.raspberrypi.org/products/raspberry-pi-3-model-b):
- Quad Core 1.2GHz Broadcom BCM2837 64bit CPU
- 1GB RAM
- BCM43438 wireless LAN and Bluetooth Low Energy (BLE) on board
- 40-pin extended GPIO
- 4 USB 2 ports
- 4 Pole stereo output and composite video port
- Full size HDMI
I will use it as an OpenHab v.2 server, with some addons as the MQTT broker...

I already own a Raspberry PI 2, but it's already running OSMC, a very nice Operating System which transforms PC in Media Center.
With the Raspberry PI 3 I received also a good "starter-kit": a 3A power supply , a transparent case and some heatsinks (see https://www.amazon.it/dp/B01DDFFOYK/ref=cm_sw_r_cp_dp_T2_UUqGzb73MSE2T)
In the next posts, I will write some words about the Raspberry PI 3 and OpenHab v.2 setup
Thursday, 10 March 2016
Data acquisition - Let's take a look...
I developed a small PHP web application which shows data and charts through the browser.
Some details:
- PHP 5 programming language and HTML5 rendering
- MARIADB database engine (the independent version of MYSQL, bought by Oracle)
- Frontend developed with Bootstrap v.3 framework
- Google Charts library for charts
- jQuery e jQuery-UI Javascript libraries
The User Interface is very simple; it aims to let me verify that all the systems are running fine.
I developed a simple homepage which shows a couple of charts for:
- daily photovoltaic production (link)
- last minutes of Methane Gas detection with a link to a page which shows daily data (link)
Dal grafico della produzione fotovoltaica si può notare un dato anomale...nelle ore notturne la produzione sembra essere costante e maggiore di 0 (cosa naturalmente impossibile...). A detta dell'assistenza, questo problema sembra essere dovuto alla potenza reattiva dovuta alla scarica dei condensatori dell'inverter
From the first chart you can see a strange thing...during the night it seems that photovoltaic production is positive...(impossible, isn't it?). It is due to the reactive power caused by capacitors in the inverter.
From the first chart you can see a strange thing...during the night it seems that photovoltaic production is positive...(impossible, isn't it?). It is due to the reactive power caused by capacitors in the inverter.
(today was a good day...we got 2Kwp)


Under every chart you can also see the last detected data.
On this page there is an auto refresh function which lets you see the real time data.
On this page there is an auto refresh function which lets you see the real time data.
Then I also developed a login page for future functionalities.


This web application is running on the Raspberry PI, where Apache 2 is installed.
I used a Dynamic DNS service to let this web application be on internet, through a NAT managed by my home router.
I used NO-IP service, which gives me 3 free domains. There is also a linux client application which keeps DNS updated every time my public IP will change.
Tuesday, 8 March 2016
Data acquisition - Photovoltaic production
Another kind of data I would like to acquire is the production of my photovoltaic plant, a 3 kwp plant built over my roof and made by SUNAGE 250 swiss modules and AROS SIRIO inverter.
I also received a little energy monitor tool, which allows me to verify power production through a wireless display. This display is able to store data in a little sqlite database. Through a USB connection, it lets me view and download data using a PC.
This tool is called OWL
http://www.theowl.com/energy-monitors/standalone-monitors/owl-usb/

My model is the OWL+USB CM160.
The OWL has a little bug because it also detects reactive power when the inverter is switched off (during the night for example...)
For my purpose I have to connect OWL to Raspberry. Unfortunately this is not supported and there aren't official drivers. Making some research over the internet, I found a good linux open source interface for OWL: EAGLE-OWL https://github.com/cornetp/eagle-owl
I compiled and installed this software directly into the Raspberry. It is a background process which detects the CM160 e gets the database data.
This is the shell of Raspberry where you can see the eagle-owl software and database files.

This process will run automatically on startup. Then I wrote a little php script which is able to read CM160 database file e put its data into mysql. In this way I could store all historical data which will be displayed through a web interface.
This script will run on Raspberry every minute (standard cron task).
Saturday, 1 August 2015
My first project - data acquisition system
I started design my first data-acquisition system with Raspberry PI and Arduino. The idea is to have a sensors network which send data to a receiver which, through ethernet, send these data to WEB/APP server.
The main components are:
- one or more sensors
- a receiver
- a DB Server for storage purpouse
- a WEB/APP server to acquire data and let remote user monitoring the system
Here is the design:

More details:
SENSORS
They can send data in different ways:
- wireless RF-433 towards receiver
- ethernet towards receiver
- USB directly towards server
They can be Arduino board or Raspberry PI or others...
Depending on the type of communication, there can be other interface boards or control led...
RECEIVER
It receives data via wireless RF-433 or via Ethernet
Through ethernet, it transmits data to WEB/APP server, for storage and monitoring purpose
It's built over an Arduino boards with Ethernet Shield and wireless RF-433 receiver. There are also control led.
WEB/APP SERVER
It receives data from receiver through ethernet or from sensor directly connected on its USB port
It stores data on DB server
It runs a web application for remote monitoring
The WEP/APP server software is the world famous Apache HTTPD, installed on Raspberry, running Fedora linux distro.
The monitoring web application is written in PHP / HTML5 using Bootstrap framework, which make it responsive.
DB SERVER
It stores data received from WEB/APP server.
The RDBMS is Mysql Community Edition installed on the same Raspberry of WEB/APP server
Saturday, 14 March 2015
Music Server on Raspberry PI
Now that I have a real linux PC always powered up with a very small power consumption and connected to my LAN, why don't use it for something less or more useful?
I read that there are lots of software which let a linux pc/server become a media center...I need the one which is able to run just in terminal mode, because I don't like graphical mode on linux server ... I always try to keep my system resources free as possible...
I found a wonderful software...MPD - Music Player Daemon (http://www.musicpd.org/)

It's a linux software which acts like a Daemon. It's able to play different music files, with the help of plugins and libraries. It can be controlled by compatible network clients and it can transmit http streaming music. It also permits to create and manage folders and playlists.
It was written for low level pc/server and so it's ok for Raspberry.
There are various client application which can manage MPD...they can be installed on Android and iOS devices too...
Installation is easy and for my OS Fedora Remix 21 it can be done using YUM (yum install mpd).
Configuration file is /etc/mpd.conf.
There are a lot of configuration parameters; only few of them are the most important: the path where MPD can find multimedia files, the ip address and port the service will listen on and the audio devices.
I used only one audio device which enable 3.5mm jack on the Raspberry PI...this jack was connected to an hifi system through a simple RCA cable

We are ready to start the service. Now all the clients can connect and control MPD Service.
We advise you to let the service automatically start on Raspberry Boot. The best thing to do is enable mpd.socket instead of mpd.service.
mpd.socket is a service which start mpd.service only after the first connected client.
If you use firewall on raspberry (ie iptables), you must configure it properly.
Now it's time to try a client. I will install it on tablet and smartphone...both with Android OS. The best Android client I found on Google Play is MPDroid, which is totally free.

Some screenshot
Smartphone


Tablet

For iOS, on Apple Store there is MPoD; it's free too.

The last thing to do is power up the hifi and pump up the volume :)
Friday, 6 March 2015
My new Raspberry PI 2
In a few days, I received my new toy...Raspberry PI 2

It has very strong tecnical characteristics...it's a real PC...but with low power consumption and a very small size...
- A 900MHz quad-core ARM Cortex-A7 CPU
- 1GB RAM
- 4 USB ports
- 40 GPIO pins
- Full HDMI port
- Ethernet port
- Combined 3.5mm audio jack and composite video
- Micro SD card slot
It has no internal storage and so it's necessary to use a micro SD card as "Hard Disk"...I chose a 16 GB Sandisk card, which is an adequate size for the OS and some other stuffs...as OS I will install Fedora 21 Remix...
Ok, it's time to play with it...
Sunday, 11 January 2015
A new adventure...
Welcome everybody in this new adventure related to eletric / electronic and computer world...
Finally, after a lot of time spent on thoughts and searches over the internet, I decided to enter in the world of Arduino boards...
Electronic and computer things always involved me a lot...and thanks to Piero's suggestions, I filled my electronic gaps and so now I'm able to design and build something useful.
Who already follows me, knows that I'm involved, always with the help of Piero, in another ambitious and exciting project: the building of a flight simulator cockpit (details on www.mylearjet45.net)
Instead, in this blog, I would like to write about my attempts to design and build something related to domotics (home automation)...mainly using Arduino and Raspberry PI boards, with related extensions...
What are Arduino and Raspberry PI?
Arduino

Arduino is an open-source electronics platform based on easy-to-use hardware and software. It's intended for anyone making interactive projects. There is a wide range of products, based on technical characteristics and dimensions...
The Starter Kits (Arduino board plus a good range of useful accessories) are very useful for the beginners.
Through input/output pins and software programming, you can interface sensors and actuators in the real world...
There are a lot of expansion cards (called shield) as Wifi/Ethernet connectivity, Infrared/Bluetooth transceiver, Sd Card Reader and so on...
The programming language is based on C language and you can find a lot of examples over the internet.
References and official website www.arduino.cc
Raspberry PI
Unlike Arduino, Raspberry PI is a real, small (credit card size) and low power consumption PC, and is able to run many Linux Distros. It has many USB ports, HDMI Output, 3.5mm A/V Jack, CPU and Ram...
Link Arduino it has many GPIO (General Purpouse Input Output) pins to interface real world sensors and actuators.
There is a wide range of models...the last one (February 2015) is Raspberry Pi 2 Model B. These are its technical characteristics:
- A 900MHz quad-core ARM Cortex-A7 CPU
- 1GB RAM
- 4 USB ports
- 40 GPIO pins
- Full HDMI port
- Ethernet port
- Combined 3.5mm audio jack and composite video
- Camera interface (CSI)
- Display interface (DSI)
- Micro SD card slot
- VideoCore IV 3D graphics core
References and official website www.raspberrypi.org
Both boards, used together, could be used to design infinite projects...fantasy is the only limit...
Now it's time to begin...with Arduino...
...we are waiting for the Starter Kit Arduno Uno Rev 3...
Stay tuned
Subscribe to:
Posts (Atom)