Disclaimer

Please, proceed carefully following the tips published in this blog, specially when Main Power is involved. I'm not responsible for any damages caused by what is written in this blog.
Thank you
Showing posts with label mosquitto. Show all posts

Saturday, 30 September 2017

Home Automation System - MQTT, SONOFF and OpenHAB v. 2


It's time to integrate MQTT and OpenHAB v.2.

As already said in a previous post (http://domoticsduino.blogspot.com/2017/08/home-automation-system-sonoff-and-mqtt_19.html), actually I have a SONOFF Basic already installed which drives a garden lamp. As we already know, it's already setup with MQTT and so let's start the OpenHAB integration.

I followed step by step the Tasmota wiki, in the integration section (https://github.com/arendst/Sonoff-Tasmota/wiki/openHAB) and so, as first step, I installed some ADDONS in OpenHAB:


Now I have to setup the MQTT connection to the MQTT broker which runs on the same Raspberry PI 3 as OpenHAB 2; so I have to edit the configuration file /etc/openhab2/config/mqtt.cfg directly through the linux shell (nano or vi) or using Eclipse SmartHome Designer, an advanced text editor optimized for OpenHAB v.2 configuration files. I used it. Its setup is very simple and then it needs to know the OpenHAB configuration files path. In my case I setup a network drive (called Z) for a samba share automatically defined by the installation of openHABianPI.

In particular, the configuration parameters I edited are the following ones:

openhabianpi-mqtt.url=tcp://localhost:1883
serve and port of the MQTT broker

openhabianpi-mqtt.clientId=openhabianpi
openHAB client Id for the MQTT connection

openhabianpi-mqtt.user=openhabian
Username for the MQTT connection

openhabianpi-mqtt.pwd=XXXXXXX
Password for the MQTT connection

openhabianpi-mqtt.retain=true
Defines if the broker should retain the messages sent to it

openhabianpi-mqtt is the logical name of the MQTT connection; in OpenHAB we could have many MQTT connections and in the items configuration we use this name as reference.

If you don't make mistakes, during the OpenHAB boot you may find log messages as following:


Ok, now I will configure items and the sitemap .

So, I created a file called sonoffbasic01.items in the folder /etc/openhab2/items in which I setup my new items.

I defined a "Switch" object ("light" category) which was linked to the full topic mqtt of the SONOFF Basic 01 tasmota/garden/light/%topic%/%prefix%/. Here is the syntax:

Switch Garden_Light_1Lamp "Garden 1-Lamp"      <light>
            (gLightSwitchGarden)
            {mqtt="
                     <[openhabianpi-mqtt:tasmota/garden/light/sonoffbasic01/stat/POWER:state:default],
                     <[openhabianpi- mqtt:tasmota/garden/light/sonoffbasic01/tele/STATE:state:JSONPATH($.POWER)],
                     >[openhabianpi-mqtt:tasmota/garden/light/sonoffbasic01/cmnd/power:command:*:default]"
             }

For info about syntax of .items files please see official documentation http://docs.openhab.org/configuration/items.html

In this way I created an item called Garden_Light_1Lamp linked to MQTT messages of topic defined in the {...} block

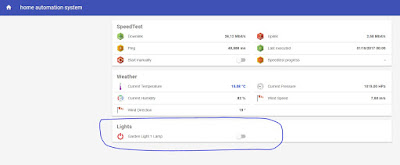
Then, I added this new item in my sitemap . So, I edited sitemap definition file, appending the following rows:

Frame label="Lights" {

Switch     item=Garden_Light_1Lamp        label="Garden Light 1 Lamp"       icon="switch"


}

After saved this file, OpenHAB updated the sitemap and the "lights" section appears


Here is a short video about my test:


Monday, 28 August 2017

Home Automation System - MQTT and RF433 to monitor photovoltaic production


Now I will try to integrate my RF433 Wireless Receiver (built on Arduino with Ethernet Shield) with MQTT, just to acquire my photovoltaic production data in my future Home Automation System

I don't write nothing more about my acquisition system; this is my old post about that:

http://domoticsduino.blogspot.com/2017/02/rf-433-mhz-data-sniffing.html

Now I would like to transmit data to my MQTT broker, for the future integration with OpenHAB

So, I have to edit the code of the Arduino sketch and let it to publish messages to the MQTT broker. In this time, the receiver publishes data to a HTTP REST Web Service

Well, using Arduino IDE (the same thing used for the SONOFF firmware upload), I open the sketch and edit the code.

I omit the technical details about the code because it's not the purpose of this post, but if you are interested in it, write me an email; I will be happy to share my code with you.

I chose the following MQTT topic:

arduino/groundfloor/rf433/solarenergy/state

I followed the same naming convention as the SONOFF :

[device]/[zone]/[type]/[data id]/state

The content of the message is simply the value of the production in Watt.

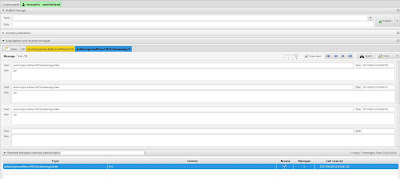
Here are the published messages, through mqtt-spy:


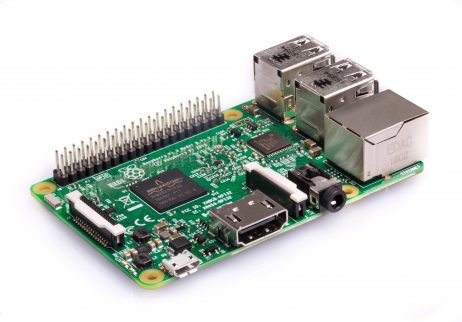
And here is the receiver:


Currently it's "mute", but the next step would be adding a led to monitor its status and eventually some environmental sensor...

Stay tuned...


Thursday, 10 August 2017

Home Automation System - SONOFF and MQTT


Ok, it's time to get all the power of SONOFF.

Just to summarize, I've got a SONOFF Pow and a SONOFF Basic, both of them with TASMOTA firmware on board.


Using this fantastic firmware, I could control the device through serial comms, web api (http) and MQTT, a very good protocol for IoT purpose, thanks to its lightweight footprint. I spoke about MQTT in a previous post (see http://domoticsduino.blogspot.com/2017/07/home-automation-system-discovering.html)

I will use mostly the MQTT protocol; so, I have to setup SONOFFs to use it, entering the MQTT broker informations and the topics. As usual, the official Wiki pages help us (see https://github.com/arendst/Sonoff-Tasmota/wiki/MQTT-Features)

For those not able to run a local MQTT broker (Mosquitto is a good free broker), it is possible to use, only for testing purpose, some free public MQTT broker (example: Mosquitto Test Server, Hive MQ and Eclipse)

Browsing the configuration pages on the SONOFF web console, you could enter all the MQTT informations. You can open the SONOFF web console using your browser and typing the ip address in the address bar. A web page similar to the following one will be shown:


Clicking on "Configuration" ==>


We will use mainly the "Configure MQTT" option: the others are self-explained.


Here, I entered the Host (ip address or host name) and the Port (1883 is the MQTT default one) for the MQTT broker.

The Client ID field is a simple string which identifies the device on the MQTT broker. It will be better to be univocal among all the devices.

User and Password fields are used for broker authentication (highly recommended!!!)

Topic and Full Topic fields are the most important one for the MQTT protocol. Here you can find some information about them: https://github.com/arendst/Sonoff-Tasmota/wiki/MQTT-Features#mqtt-topic-definition

- Topic: normally used to identify the device; it will be part of the MQTT Full Topic. It will be better to be univocal among all the devices.

- Full Topic: is the complete topic used for MQTT messages.

Inside Full Topic, we could use two variables called %topic% and %prefix%.

%topic% will be replaced by one of the following system variables, according to the real situation: Topic, GroupTopic, ButtonTopic, SwitchTopic e MqttClient.

%prefix% identifies the type of message and could take three distinct values, corresponding to the folloing system variables: Prefix1, Prefix2 and Prefix3

- Prefix1 = cmnd, used for command messages
- Prefix2 = stat, used for status messages
- Prefix3 = tele, used for telemetry messages

When I speak about system variables, I mean a list of configurable TASMOTA properties for every device. There are so many...Here you can find the complete list: https://github.com/arendst/Sonoff-Tasmota/wiki/Commands#command-overview

Here is my SONOFF Basic configuration:


Topic = sonoffbasic01

Full Topic = tasmota/garden/light/%topic%/%prefix%/


For Topic and Full Topic I followed a naming convention, in order to understand the mean of a message, just reading its topic.

The Topic, as said before, identifies the single device; so I used the type of device followed by a progressive number. For example, the topic of the SONOFF Pow will be sonoffpow02. The same topic string will be used also as network name and mqtt client id for the device.

The naming convention for the Full Topic is: firmware/zone/type/%topic%/%prefix%/

I would like to clarify that these are not rules but only suggestions. I chose this naming convention, you could use another one. It's up to you...

The final step is to enable MQTT protocol on the device, looking for the MQTT enable flag in the Configure Other page.

Well, finally now I'm ready to test my SONOFF with MQTT.

******************************************************

A small update about a configuration error I found later

http://domoticsduino.blogspot.com/2017/08/home-automation-system-sonoff-and.html


Saturday, 5 August 2017

Home Automation System - OpenHAB 2 on Raspberry PI 3


It's time to setup my Home Automation System. I chose OpenHAB v.2, see my previous post http://domoticsduino.blogspot.com/2017/07/home-automation-system-discovering.html)


My target is to install OpenHAB v.2 and all related services on my brand new Raspberry PI 3; reading the official documentation (http://docs.openhab.org/installation/openhabian.html), I discovered OpenHABianPI, a custom operating system based on Raspian Lite, but optimized for OpenHAB. So I flashed on SD-CARD, with Etcher, a complete pre-configured image, downloaded from https://github.com/openhab/openhabian/releases. Then I plugged the SD-Card in the Raspberry slot and power it up, after connected a LAN cable (there is also a procedure to connect the raspberry direct to WiFi...http://docs.openhab.org/installation/openhabian.html#wifi-setup). The setup of OpenHABianPI automatically starts during boot and you can follow it through SSH. In about ten minutes the system will be ready.

The first thing to do is run the openhabian-config tool, which will let us to setup the complete system.

sudo openhabian-config


01 - Update and 02 - Upgrade System will keep the system updated and you will run them frequently.

Then...

- 10 - Apply Improvements ==> run all the submenù

- 20 - Optional Components ==> 21 - Log Viewer, 22 - Mosquitto (the MQTT broker) and 23 - Grafana (not mandatory but it's a very nice dashboard tool)

- 30 - System config ==> all optional except 34 - Change Passwords which will secure your system; 37 - Move root to USB;  is a very useful choice...it lets you to use an external USB Hard disk, instead of SD Card. I configured both my raspberries in this way, but I followed a manual procedure (see https://www.raspberrypi.org/forums/viewtopic.php?f=29&t=44177&hilit=usb+stick+operating+system)

- 40 - openHAB related ==> 43 - Reverse Proxy very useful option to expose OpenHAB system on the internet and access it from everywhere; it will configure NGINX as SSL reverse proxy - pay attention that with this option your system will be exposed to internet and so if not well secured could permit to everyone to take control of your home devices.

Ok, OpenHAB is ready to use. I suggest you to take a look at the official documentation, tutorials and forum on the OpenHAB website http://docs.openhab.org/ https://community.openhab.org

The official youtube channel is https://www.youtube.com/channel/UC7OK88DW0La_BJlcXZg8ydQ/feed

Just another useful info: OpenHAB could use a lot of services to persist data; one of these services uses InfluxDB, a NOSQL database. It lets OpenHAB to store historical data series which could be displayed as charts or tables. Grafana, the open source dashboard tool, is perfectly integrated with InfluxDB. You could also use the standard MYSQL RDBMS as a persistence service. I will use InfluxDB, and so I will install it on the same raspberry as openHAB (see https://docs.influxdata.com/influxdb/v1.3/introduction/installation/)

Let's summarize my system:

- OpenHAB v 2.1
- Mosquitto MQTT Broker, with authentication
- Grafana
- InfluxDB, as OpenHAB persistence service
- Reverse proxy SSL with authentication, through NGINX , to expose OpenHAB and Grafana on the internet, in a secure way

If you are not able to setup and mantain reverse proxy, NAT and port forwarding, you could use My OpenHAB service, which lets you to exposed on the internet a local OpenHAB installation; registration is required.

Ok, we are ready to use our Home Automation System